Whether a DIYer or a Professional, you generally rely on battery-powered tools to save time and hassle. Milwaukee is the industry-leading brand for battery-powered devices. Despite their compatibility and versatility, sometimes the batteries have issues holding charge.
Don’t panic if your battery deceives you while working on an important task. You can resolve the issues efficiently and quickly on your own. We have tested the Milwaukee batteries and found some common issues you must face.
Therefore, to save you from inconvenience, we have discussed the general problems and the quick fixes as to why your Milwaukee battery not charging.
Let’s get into the details.
Milwaukee Battery Not Charging – Reasons
The main reason for the Milwaukee M 18V battery not charging might be the faulty power outlet, malfunctioning charger or battery, rustic terminals, adverse temperature, or dead battery.
Milwaukee Battery Charger Lights
Different types of LED light indicators illuminate the Milwaukee Battery charger while charging. You should know about these light indicators to troubleshoot minor charging-related issues without hassle.
Here is a quick overview of these indicators:
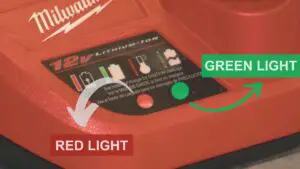
1. Red (Solid)
While charging the Milwaukee battery, if your charger illuminates the solid red LED indicator, it means your battery is charging correctly.
2. Red (Flashing)
After placing the battery and plugging it in, if the charger’s red light continuously blinks, it indicates that the battery is facing some issue holding a charge properly, or its temperature may be too hot or cold to hold a charge.
3. Green(Solid)
Sold green light shows the battery is full and disconnects it from the charger. Overcharging can shorten the battery lifespan.
4. Green (Flashing)
While charging, if the green LED flashes, it indicates that the battery is going to be fully charged within a few minutes, or there may be little time left to charge it fully.
5. Red & Green (Flashing Simultaneously)
Sometimes the red and green lights flash simultaneously to indicate you there might be some serious issue with charging. The battery may be faulted, damaged, wet, not seated properly on the charger, or the terminals are not connected directly.
Reference: http://documents.milwaukeetool.com/TIY476.pdf
Milwaukee 18V Battery Indicator Lights
Milwaukee M18 batteries have different light indicators that are also known as fuel gauge indicators. If you want to know the power status of your battery, you can see the LED light indicators to plan your work accordingly.
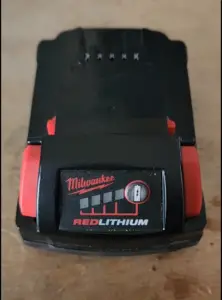
1. Lights 1 – 4
The lights 1-4 indicate that you have a solid remaining run time, and you can Continue working on big projects without worrying about power running out.
2. 1 Light, Flashing Slowly
This slowly flashing light indicates that less than 10% of run time is left. In this state, you have to prepare to charge the battery pack. It expands the lifespan of batteries as well to charge them before they are entirely discharged.
3. 1 Light, Flashing Quickly
If one light flashes quickly, it means the battery pack is going to end discharge, and it’s time to charge the battery pack.
4. Lights 1-4, Flashing Quickly
When 1-4 lights flash quickie, it indicates that the current draw is too high. This situation may create when you are working on highly demanding tasks. To solve this issue, release the trigger and restart, as well as reduce pressure.
5. Lights 1&3 / 2&4, Flashing Alternatingly
When you working on high-end applications, the battery temperature becomes too high. As a result, the 1&3 / 2&4 light began to flash alternatively. To fix this issue, release the trigger and allow the battery to cool down.
Reference: https://documents.milwaukeetool.com/TIY491.pdf
7 Reasons with Quick Fixes
If your Milwaukee battery is not charging entirely or partially, there might be certain reasons behind it. Some reasons are very minor, and you can solve them in a matter of seconds without any technical knowledge. Contrarily some major issues are not repairable, and they ended up with a new replacement.
To save your wallet on spending a new battery, we have explained the 7 reasons with quick fixes that enable you to troubleshoot your malfunctioning charger or battery in no time.
Reason 1: Faulty Power Outlet
Fix # 1: Check the Functionality of the Power Outlet
Whenever you plug an electric device into a power outlet, and it doesn’t work, the first and foremost step should be the testing of the power socket. In the case of a charging issue, before doubting the battery or charger, you should check the functionality of the power outlet. You can follow the step below:
- Plug the charger into the power socket.
- If not working, unplug it or plug in other devices or mobile chargers to check its functionality.
- If the power outlet works appropriately, plug the charger into other sockets to check its credibility.
- In additional sockets, you may have different outputs or the same functionality as the charger.
Note: if the power outlet is functioning well, there might be a problem with the charger or battery. Therefore, step on to the next fix.
Reason 2: Malfunctioning Charger or Battery
Fix # 2: Cross-Check the Charger and Battery
After relying on a power outlet, you should turn it over to check the battery or charger. The culprit may be the malfunctioning charger or the battery. To reveal the hidden culprit, use this trick:
- Plug in the charger and inserts the battery.
- The red indicator illuminates if the battery holds the charge.
- If there is no sign of charging, replace the battery with another.
- If the charger is functioning well and the LED indicator illuminates solid red.
- On the other hand, if the battery doesn’t hold the charge even after replacing the battery, the charger is at fault.
Note: there might be a probability that both batteries are faulted, or the charger is defective. In both situations, try the next fix for detailed analyses.
Reason 3: Improper Voltage
Fix # 3: Check Voltage with a Multimeter
The improper voltage is the crucial factor that can be the major cause behind the malfunctioning of the battery or charger. You should check the voltage of the battery as well as the charger to make sure both are working properly. To check voltage, follow these steps:
- Use the multimeter to check the voltage of the Milwaukee battery and charger.
- Firstly, plug out the charger and remove the battery.
- Connect the +ve (red) probe of the multimeter to the +ve terminal of the charger and the -ve (black) probe to the negative terminals.
- Monitor the LED display to check the voltage of the charger.
- If the charger shows the 18V output voltage, it’s the proper range, and the charger works well.
- Check the voltage of the battery with the same process.
- The correct voltage reading of a fully charged battery should be 18V.
- If the voltage reading of the battery or charger is not in this perfect range, it means it’s faulted.
Reason 4: Dirty Metal Terminals
Fix # 4: Clean the Dust and Corrosion
The dirty metal terminals of the battery and charger can’t connect properly with each other. Therefore, this broken relationship can cause the battery doesn’t hold the charge. So, to strengthen the relationship of metal to metal terminals, you must clean them properly. The dust, debris, and corrosion accumulation greatly hinder the exact connection of metal contacts. Follow this simple process:
- Unplug the charger and disconnect the battery.
- Clean the charger terminals with the soft Q-tip dampened with rubbing alcohol.
- Rub gently to clean the delicate terminals safely.
- Clean the battery terminals with sandpaper.
- Battery terminals are a bit tiny and somewhat difficult to clean.
- Use a folded sandpaper to reach the terminals and rub smoothly.
- Wait to dry the terminals, and then insert the battery in the charger.
- Hopefully, this process will give positive results, and the battery will hold the charge.
Pro Tip: Don’t insert the battery in wet condition; it may have major issues. Let the battery and charger dry properly, then connect them to charge.
Reason 5: Run Out of Power Juice
Fix # 5: Power Juice from Other Batteries
If your battery runs out of power juice and doesn’t hold a charge. You can revive your battery by providing it with power juice from other batteries. It seems as simple as you usually jump-start the car battery. To make your Milwaukee M18 battery capable of holding the charge, follow these quick steps:
- Take your M18 dead battery and a fully charged M18 battery.
- Place them side by side.
- Use two speaker wires or insulated wires as per your availability.
- Uncover the metal wire from the rubber cover on both ends.
- Connect one end of the +ve (red) wire to the dead battery’s positive terminals and another to the charged battery’s positive terminals.
- Connect one end of the -ve (black) wire to the negative terminals of the dead battery and another end to the negative terminals of the charged battery.
- Wait for a while; the dead battery began to suck the charger from the charged battery.
- Then click on the fuel gauge button of the battery to see whether it’s charging or has fully charged.
Warning: Take great care while connecting the terminals. The wrong connection may result in a short circuit, and your battery would be at risk.
Reason 6: Adverse Temperature
Fix # 6: Moderate the Temperature
The basic and minor reason for the battery not charging. When you use the battery, it gets rather heated up, and you put it on the charger. Sometimes it takes time to charge the hot battery or occasionally indicates some issue by flashing red light.
- The easy solution is that always keep your battery stored in place at a moderate temperature. The temperature shouldn’t be too hot or too cold.
- Don’t insert your battery into the charger soon after prolonged usage.
- Always put your battery on charge when its temperature is moderate.
Pro Tip: Don’t store the battery where temperatures may exceed 50°C (120°F), such as in direct sunlight.
Reason 7: Flat Battery
Fix # 7: Give Tiny Boosts
When you use your battery until the last drop of power juice, it gets flat and starts creating issues in holding charge. To make them capable of charging as usual, you have to give them tiny boosts. For this process, you have to be patient and wait till the battery holds charge. Here is the process how you can do:
- Put your Milwaukee M18 battery on the charger for a while.
- Turn off the charger for 2-3 minutes.
- Then turn on the charger again and turn off for a few minutes.
- Repeat this process 4-5 times.
- These tiny boosts help it to hold the charger gradually.
Pro Tip: Stop using your power tool after indicating the low battery warning. When it entirely runs out of power, it’s rather difficult to hold on to the charge quickly.
Not Fixed Yet (How to Reset Milwaukee M18 Battery)
If your Milwaukee m18 battery is not fixed yet despite applying all the processes above, let’s try a final solution.
Reset your battery by following this process:
- Disconnect the battery from the charger or tool.
- Press the fuel gauge button to see the power status.
- Press and hold the power on/off button if it’s completely flat.
- Hold for a few seconds and release.
- Then, insert the battery into the charger; it will work fine.
Common Problem & Solutions
1. Milwaukee battery says fully charged, but not working
If your Milwaukee battery says fully charged but not working, there might be an issue with the battery or the tools themselves. Firstly check your tool with another battery. If the tool is functioning properly, then check your battery and apply the above-mentioned fixes to solve the issue.
2. Milwaukee battery shows green but not charging.
If your Milwaukee battery shows green but not charging is a frustrating situation. There might be some reasons behind this, such as an overheated battery, incorrect insertion, or some internal issues. Try to keep the battery temperature moderate, insert it in the charger correctly until you listen to an audible click, or reset it. These methods work significantly.
3. The new Milwaukee battery is not charging.
The reason behind the new Milwaukee battery not charging may be the sleeping mode due to not use for a more extended period. In this situation, revive your new battery by kick start it with tiny boosts or jump-start it by converting power juice from a fully charged battery to the new one.
Conclusion
If your Milwaukee battery is not charging, don’t blame the Milwaukee batteries or power tools. No doubt, it’s one of the top-of-the-line brands among its competitors. The tools, disorders, and issues are part of the work. You just have to be capable of solving minor issues yourself to get the best out of these tools.
To provide you the significant advantages, we have elaborated on the 7 easy and quick fixes that help you in annoying situations while handling the Milwaukee M18 batteries. So, try these fixes before going to the technician and replacing the dead battery with the new one.