What is Drill Press Runout
A drill press is a versatile and essential tool for any woodworker or metalworker. However, drill press runout can be a frustrating issue that can hinder the performance of your drill press. In this article, we’ll explore what drill press runout is and its main parts.
Drill press runout refers to the amount of wobble or eccentricity that occurs when the chuck or drill bit spins in the drill press. In other words, it’s the degree to which the drill bit moves off-center as it rotates. When the drill bit wobbles, it can cause imprecise drilling and inaccurate hole sizes.
To understand drill press runout, it’s essential to know its main parts: the drill press quill and the drill press shaft.
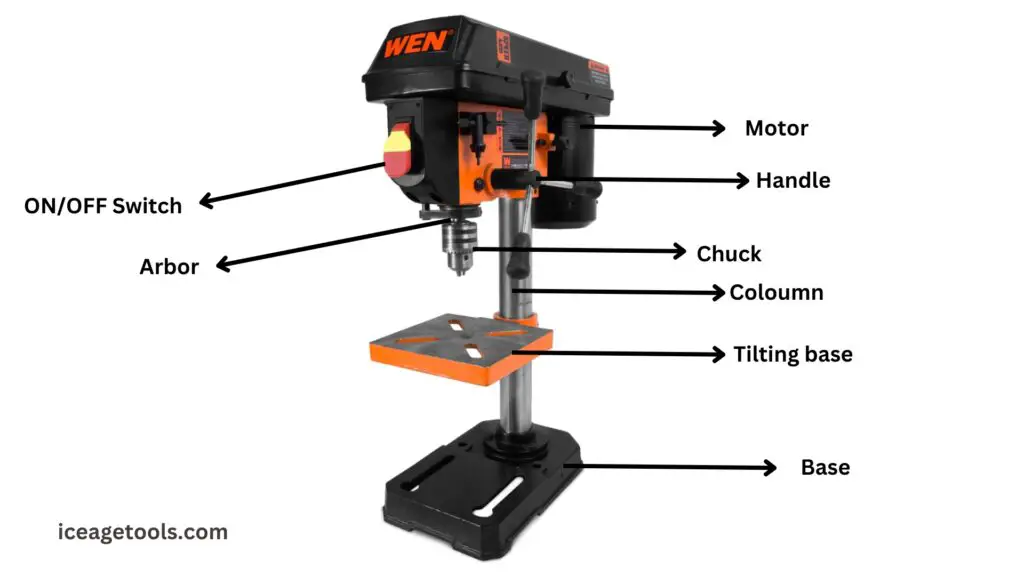
1- Drill Press Quill
The quill is the hollow metal tube that extends from the head of the drill press and houses the spindle assembly. The spindle assembly consists of the chuck, drill bit, and the spindle itself. The spindle is the rotating component of the quill that turns the drill bit.
2- Drill Press Shaft
The shaft is part of the drill press that connects the quill to the motor. It’s a long metal rod that runs the length of the drill press column and transmits the rotational force from the motor to the quill. The shaft has bearings that support it and prevent excessive wobble.
The amount of runout that occurs in a drill press is affected by both the quill and the shaft. If the quill isn’t centered properly or the spindle isn’t perpendicular to the work surface, runout can occur. Additionally, if the shaft is bent or has worn-out bearings, it can also cause a runout.
Symptoms of Drill Press Runout
Drill press runout can cause several symptoms that can affect the quality of your work and even cause damage to the drill press. Some of the common symptoms of drill press runout include:
- Wobbling: If the drill bit wobbles or spins unevenly, it can be a sign of drill press runout. This can cause the drill bit to produce uneven holes or damage the workpiece.
- Chatter: When the drill bit vibrates or makes a rattling noise, it is a sign of drill press runout. This can be caused by uneven pressure on the drill bit or an unbalanced drill press.
- Reduced accuracy: If the drill press runout is significant, it can cause the drill bit to produce holes that are larger or smaller than intended. This can result in a lack of accuracy and precision in your work.
- Increased wear and tear: Drill press runout can cause increased wear and tear on the drill bit, resulting in a shorter lifespan. It can also cause damage to the drill press itself, leading to costly repairs.
- Overheating: If the drill bit is not spinning evenly, it can cause friction and overheating, which can damage the drill bit and workpiece.
Causes of Drill Press Runout
Drill press runout is a common issue that occurs in drill presses. The runout occurs when the drill bit moves in a circular motion while drilling, causing inaccuracies in the drilling process. There are several causes of drill press runouts, and identifying the root cause is essential to fixing the problem.
1- Worn-out parts: One of the main causes of drill press runout is worn-out parts. If the drill chuck or the spindle assembly is worn out, it can cause the drill bit to move in a circular motion while drilling. This can cause inaccuracies in the drilling process and affect the overall quality of the workpiece.
2- Misalignment: Another common cause of drill press runout is misalignment. If the spindle assembly is not properly aligned with the drill chuck, it can cause the drill bit to move in a circular motion while drilling. Misalignment can occur due to several factors, such as improper assembly or wear and tear.
3- Poor maintenance: Drill press runout can also be caused by poor maintenance. If the drill press is not cleaned and lubricated regularly, it can cause the parts to wear out quickly, resulting in runout issues.
4- Overheating: Overheating is another cause of drill press runouts. When the drill bit overheats, it can cause the metal to expand, which can cause the drill bit to move in a circular motion. This can result in inaccuracies in the drilling process.
5- Low-quality drill bits: Finally, low-quality drill bits can also cause drill press runouts. If the drill bit is not properly manufactured or is made from inferior materials, it can cause the bit to wobble while drilling, resulting in runout issues.
How to Measure Drill Press Runout
Measuring drill press runout is a crucial step toward identifying the problem and finding a solution. Here’s a detailed guide on how to measure drill press runout:
1- Gather the necessary tools
To measure drill press runout, you’ll need a dial indicator, a magnetic base, and a mandrel. The mandrel should be the same size as the drill bit you plan to use.
2- Mount the dial indicator
Attach the magnetic base to the drill press table and position the dial indicator near the quill. Make sure it’s perpendicular to the quill and touches the chuck.
3- Set the dial indicator to zero
Press the plunger on the dial indicator to zero it out. This ensures that any movement is accurately measured.
4- Attach the mandrel
Insert the mandrel into the chuck and tighten it. Make sure it’s securely in place.
5- Measure the runout
Lower the quill until the mandrel touches the dial indicator. Slowly turn the chuck and watch the dial indicator. The movement on the dial indicator shows the amount of runout.
6- Take multiple measurements
Take at least three measurements at different points around the chuck to ensure accuracy. Note the maximum runout measurement.
7- Compare to acceptable runout
Refer to the manufacturer’s specifications for the drill press to determine the acceptable amount of runout. If the measured runout exceeds the acceptable range, it’s time to find a solution.
Measuring drill press runout is a straightforward process, but it requires attention to detail to ensure accuracy. Following these steps will help identify the amount of runout on your drill press, which is crucial to finding a solution.
Acceptable Drill Press Runout
The acceptable level of runout will depend on the specific application and the tolerances required. For example, a machinist performing precision drilling will require a lower level of runout compared to someone doing general woodworking.
When it comes to drilling press runout, there are a few industry standards to consider. In general, a runout of 0.003 inches or less is considered acceptable for most applications. This means that the drill bit will not deviate more than 0.003 inches from its intended path during rotation.
However, it is important to note that acceptable runout levels can vary depending on the type of drill press and the material being drilled. For example, when drilling into softer materials like wood or plastic, a higher level of runout may be acceptable since these materials are more forgiving than harder materials like metal. On the other hand, when drilling into metal, a lower level of runout is required to achieve precise results.
It is also important to consider the type of drill bit being used when determining acceptable runout levels. For example, twist drill bits are more forgiving when it comes to running out compared to spade bits or Forstner bits. This is because twist bits have a more gradual point and are less likely to catch or bind during drilling.
If the drill press runout is found to be outside of acceptable levels, there are a few things that can be done to improve it.
Solution: Drill Press Runout Fix
As we discussed earlier, there can be various causes of drill press runout. Before you start fixing the issue, it is essential to identify the root cause. Here are the solutions to fix drill press runout based on the different causes:
-
Chuck misalignment
If the chuck is not aligned properly, it can cause drill press runout. Here’s how you can fix it:
- Loosen the chuck by turning it counterclockwise.
- Insert a drill bit into the chuck.
- Tighten the chuck by turning it clockwise while holding the drill bit in place.
- Use a dial indicator to check the runout at the tip of the drill bit.
- If the runout is still present, try rotating the chuck slightly while keeping the drill bit in place.
- Continue rotating the chuck until the runout is reduced to an acceptable level.
-
Worn chuck
If the chuck is worn out, it may need to be replaced. Here’s how you can replace the chuck:
- Remove the old chuck by unscrewing it from the spindle.
- Clean the spindle and remove any debris or dirt.
- Install the new chuck onto the spindle.
- Tighten the chuck securely onto the spindle.
- Use a dial indicator to check the runout at the tip of the drill bit.
- If the runout is still present, try rotating the chuck slightly while keeping the drill bit in place.
- Continue rotating the chuck until the runout is reduced to an acceptable level.
-
Bent spindle
If the spindle is bent, it will need to be replaced. Here’s how you can replace the spindle:
- Remove the old spindle from the drill press.
- Clean the spindle housing and remove any debris or dirt.
- Install the new spindle onto the drill press.
- Use a dial indicator to check the runout at the tip of the drill bit.
- If the runout is still present, try rotating the chuck slightly while keeping the drill bit in place.
- Continue rotating the chuck until the runout is reduced to an acceptable level.
-
Worn quill bearings
If the quill bearings are worn out, they may need to be replaced. Here’s how you can replace the quill bearings:
- Remove the quill from the drill press.
- Clean the quill housing and remove any debris or dirt.
- Install the new quill bearings onto the quill.
- Reinstall the quill onto the drill press.
- Use a dial indicator to check the runout at the tip of the drill bit.
- If the runout is still present, try rotating the chuck slightly while keeping the drill bit in place.
- Continue rotating the chuck until the runout is reduced to an acceptable level.
-
Loose quill
If the quill is loose, it may need to be tightened. Here’s how you can tighten the quill:
- Turn off the drill press and unplug it from the power source.
- Remove the cover from the quill collar.
- Tighten the quill collar by turning it clockwise.
- Replace the cover on the quill collar.
- Use a dial indicator to check the runout at the tip of the drill bit.
- If the runout is still present, try rotating the chuck slightly while keeping the drill bit in place.
- Continue rotating the chuck until the runout is reduced to an acceptable level.
Checklist for Fixing Drill Press Runout
| Step | Task | Description |
|---|---|---|
| 1 | Identify root cause | Use the symptoms and causes discussed earlier to identify the root cause of the runout. |
| 2 | Check quill | Check if the quill is bent or worn out. If so, replace it. |
| 3 | Check chuck | Check if the chuck is damaged or worn out. If so, replace it. |
| 4 | Check spindle | Check if the spindle is bent or worn out. If so, replace it. |
| 5 | Check bearings | Check if the bearings are damaged or worn out. If so, replace them. |
| 6 | Clean and lubricate | Clean and lubricate all the parts of the drill press. |
| 7 | Reassemble | Reassemble the drill press and check the runout. |
| 8 | Test runout | Test the runout by drilling a hole and measuring its diameter. |
| 9 | Adjust quill | If the runout is still not within acceptable limits, adjust the quill. |
| 10 | Repeat test | Repeat the test and adjustment until the runout is within acceptable limits. |