In woodworking and metalworking, drill presses are indispensable tools. Nevertheless, falling out of the chuck is a common problem with drill presses. A wobbly or loose chuck can not only distract the accuracy of your work but can also lead to severe injuries due to its heavy weight.
It’s neither as easy as a piece of cake nor a big deal as well. You can do it with a few quick hacks even though you’re not tech-savvy. In no time, you can restore your drill press to its original functionality. In this article, we will provide you with five quick and easy hacks that enable you to fix your drill press chuck falls out, so you can carry on your drilling projects with more accuracy like a new one.
So, let’s dive deeper into the details!
Drill Press Parts Identification

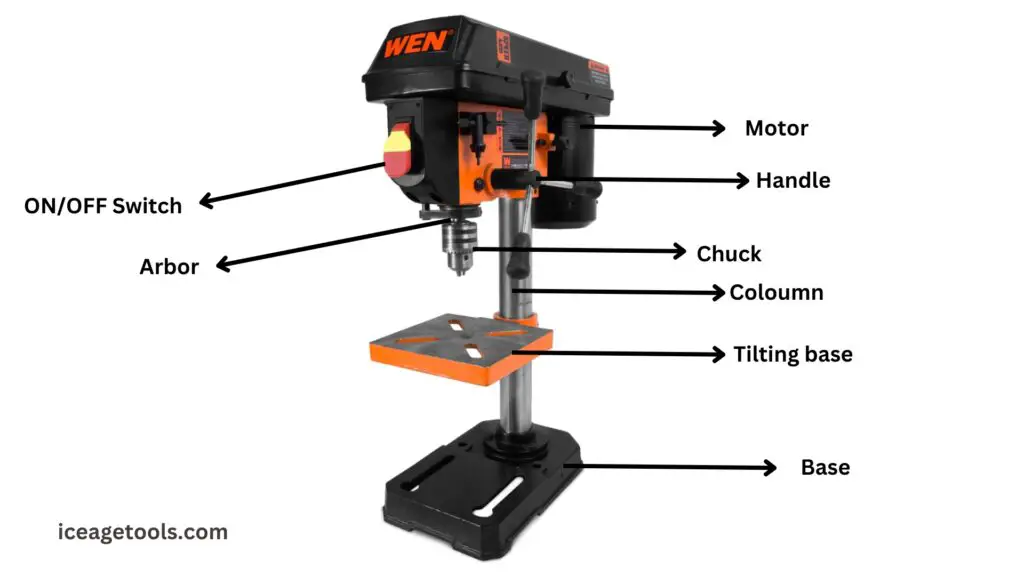
You must be very well aware of the main parts of a drill press before assessing the possible causes and solutions of a drill press chuck that keeps falling out. Without proper knowledge of the main components, you won’t be able to understand how this problem occurs.
The chuck, the arbor, and the key are the main components that contribute to the chuck falling out. Chucks are mounted on arbor shafts, and the key tightens the chuck to ensure it is firmly attached to the arbor. In drill presses, drill bits are held firmly and adequately by the chuck and arbor shaft, respectively.
Identifying and understanding these parts is crucial to diagnosing and fixing the falling-out chuck issue. A clear understanding of how each component works together can help you identify and fix the problem quickly and easily.
Drill Press Chuck
A chuck is an essential component of a drill press that is used to hold the drill bit tightly and secure it properly. It is attached at the bottom of the spindle and connects the drill bit to the drill press to rotate on its axis. For a secure grip on the shank of the drill bit, tighten the chuck with either a key or by hand. Keeping the drill bit securely gripped on the drill press chuck and adjusting the chuck as necessary plays an essential role in precision and safety. Additionally, it allows for precise positioning and depth adjustments.
The Chuck Arbour
The chuck arbor transmits power from the drill press’s spindle to the chuck.
It is a cylindrically shaped rod with one end inserted into the spindle and the other connected to the chuck. The chuck arbor can fit into the chuck, and a secured screw or other mechanisms enables you to attach and detach the chuck from the drill press.
Usually, the chuck arbor is engineered with high-strength steel or other sturdy material to add to its stability and reliability.
It is primarily responsible for ensuring a firm and reliable connection between the chuck and spindle, which results in reliable and accurate drilling operations.
How Chuck and Arbour are Fixed
You can fix the arbor and the drill chuck by various methods. The accurate fixing depends mainly upon the design and model of the drill press. Both of these parts can fix in place properly by securing the mechanical connection.
1- Screw Mechanism
Firstly, the commonly used method of fixing the arbor and the chunk is through a screw mechanism. The arbor’s threaded end fits easily into the chuck, and other fasteners tighten the chuck onto the arbor. By using this mechanism, it is possible to easily remove the chuck for cleaning, maintenance, or replacement purposes.
2- Keyed or Keyless chuck
Another method uses a special wrench to tighten or loosen a keyed or keyless chuck.
This type of chuck requires the arbor to be fitted into it and securely tightened with a specific wrench. When tightening a keyless chuck, a ratchet mechanism is used, while when tightening a keyed chuck, a key fits into a slot on the chuck.
Whatever method is used to attach the chuck to the arbor, the goal is always safety and accuracy in drilling operations with a secure and stable connection. A drill press’s longevity and reliability depend on properly maintaining the relationship between the chuck and arbor.
Why Your Drill Press Chuck Falls Out
Several factors could cause a drill press chuck to fall out:
1- Dirty or Rusty Components
A chuck’s or arbor’s threads can become dirty due to debris, dirt, or rust accumulating, making the connection less effective. The connection security depends upon the friction resulting due the rubbing of the arbor and chuck. The dirt and debris make a layer between both parts, and the friction doesn’t create that result in the drill press chuck falling out.
2- Loose connection
It is possible for the screw or fastener holding the chuck onto the arbor to loosen over time, leading to the chuck falling off.
3- Worn or damaged threads
The chuck may fall out if the arbor or chuck threads are worn or damaged and are unable to grip securely.
- Improper installation
Incorrect chuck installation on the arbor may result in it falling out.
- Excessive force
In the event that you apply too much force to the drill bit, it may loosen and fall out of the chuck.
5 Hacks to Keep Your Chuck From Falling Out
The following five hacks will help you prevent your drill press chuck falls out:
Basic & Essential: Remove dust and debris
In order to ensure a secure connection, the chuck, and arbor should be kept clean and free of dust. When threads and other parts are cleaned and maintained regularly, dust and debris are less likely to build up on them, as well as there is a little chance of losing connection and chuck falling out.
Hack # 1: Slight Hammer Stroke
You can fix a drill press chuck that is falling out by using a slight hammer stroke as follows:
- Make sure the drill press is unplugged and turned off.
- Remove the screw or fastener from the arbor that holds the chuck in place.
- Take a wooden piece and place it under the chuck.
- Using a light wooden hammer, tap the chuck against the arbor until it is snug. You should refrain from hitting it too hard since this can cause damage.
- Screw or fasten the chuck in place by tightening its screw or fastener.
- Switch on the drill press and test whether the fall-out issue is resolved or not.
Hack # 2: Heat the chuck to about 50-80 Celsius
The following steps will help you fix a fallen drill press chuck with heat:
- Power off the drill press.
- It is recommended that the chuck be heated to a temperature of between 50 and 80 degrees using a heat gun or other heating device.
- Using the chuck key, reinstall the chuck to the arbor and tighten it.
- Drill press chucks should be allowed to cool completely before being used again.
Pro Tip: In order to avoid burn injuries, please handle the chuck with heat-resistant gloves while heating.
Hack # 3: Use Abrasive (Blue Loctite, Talc Power, Valve Grinding paste)
You can fix a drill press chuck that has fallen out with abrasives by doing the following steps:
- Power the drill press off.
- To prevent corrosion of the socket, clean the internal and external surfaces of the chuck and the arbor to remove any dirt, oil, or debris.
- Put some abrasive on the outside and inside of the chuck threads and the arbor (such as blue Loctite, talc powder, or valve grinding paste).
- Utilizing the chuck key, tighten the chuck along with the arbor.
- Now turn the drill press on and check it by drilling a few holes. Is the issue fixed or not?
Pro Tip: For your safety, wear protective gear such as gloves and eye protection and follow the instructions on the product label.
Hack # 4: Pressure with Hydraulic Jack
Using a hydraulic jack, you can fix a drill press chuck that falls out as follows:
- Switch off the drill press.
- Put the hydraulic jack under the falling chuck and ensure it is level.
- Use a hydraulic jack to apply pressure slowly to the drill press until it presses the chuck slightly.
- Continually hold the pressure until the drill press is repositioned once the hydraulic jack has made contact.
- Ensure that the drill press chuck is level when you remove the hydraulic jack after it is securely in place.
Pro Tip: The drill press chuck and other components can be damaged if a hydraulic jack is improperly used to fix a drill press fallout. That’s why use it carefully.
Hack # 5: When Notching/Tubing: Use Drill AlongSide
In order to fix a drill press chuck falling out when notching or tubing, you can use a drill alongside. The steps are as follows:
- Turn off the drill press.
- If you drill an identical bit to the drill press, you can use it to support your notching or tubing while you work.
- Set up the drill alongside the drill press by aligning it with the drill press and placing it on a stable surface.
- You can now begin notching or tubing using the drill press as usual, using the drill as a guide. This way, you will prevent the drill press chuck from falling out of position.
- As you work, periodically check to ensure that the drill press chuck is stable and that the drill provides enough support.
Pro Tip: In order to ensure that your work is accurate and precise, you should use a drill alongside the drill press when notching or tubing.
Frequently Asked Questions (FAQs)
1- Why does my chuck keep falling out of my drill press?
Several factors can cause a drill press chuck to fall out, such as a loose chuck, worn or damaged keys, worn or damaged spindles, or excessive drilling force.
2- How do you get the chuck to stay on a drill press?
To keep the drill press to stay on the drill press, ensure its cleanliness regularly, fix it properly to the arbor, and connect it with the arbor securely by using a specific wrench.
3- How do you fix a loose chuck?
To fix the loose chuck, tighten it to the arbor and shaft with a proper key. Or tap it slightly with a wooden piece and a wooden hammer.
4- How do you lock a chuck?
You can lock the chuck to the drill press and arbor manually. Alternatively, you can use the chuck key to tighten the chuck in place.
5- How to Fix the drill press chuck stuck?
To fix the drill press chuck stuck to its place properly, you should clean it on a regular basis, tighten the chuck to the arbor carefully and accurately, use a heating process, and use some chemicals to clean metal chunks.
Conclusion
Our ultimate guide explains the main causes of drill press chucks falling out as well as their quick and easy fixes. In order to help you out in this critical situation, our expert team has conducted extensive research to solve these issues for you. With a detailed reading, you should be able to resolve these issues on your own without too much hassle.

